Best Practices in High‑End Residential Lighting Control Systems Pt. 3: Keypad Engraving and Custom Labels
The Challenge of Keypad Engraving and Custom Labels
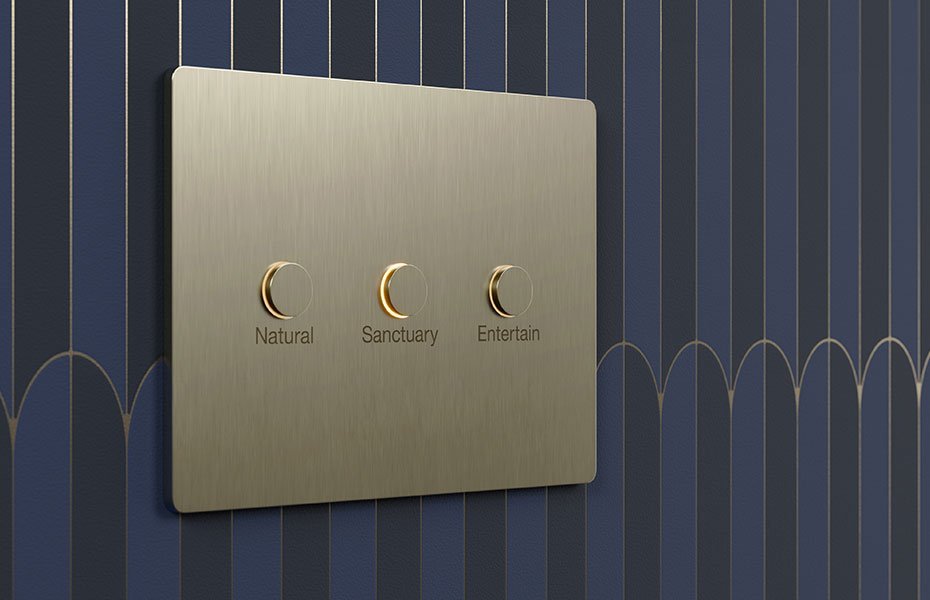
One hallmark of a finished lighting control system is engraved keypads: the text or icons etched on each button describing what it does (e.g. “Welcome”, “All Off”, “Kitchen”). High-end systems virtually always include this customization. It not only looks professional but also makes the system user-friendly – family members and guests can press a button with confidence when it’s clearly labeled * . However, getting those custom-engraved buttons ready at the right time involves coordination and occasionally causes headaches in projects.
Why Engraving is Important (and Inevitable)
In luxury projects, personalized engraving has “risen in popularity” significantly * . It’s no longer an afterthought; clients expect that each button will be tailored to their lifestyle. Even so, some integrators encounter clients who are slow to finalize what each button should say. In the beginning of a project, a homeowner might not know exactly what scenes they’ll want, or what to name them. It’s easy for a client to say, “We’ll figure out the labels later.” But postponing those decisions can lead to delays in ordering the engraved buttons, meaning the home might be technically finished with blank or temporarily labeled keypads.
Two common issues are homeowner indecision and dealer (integrator) oversight or delays.
Homeowner Indecision
It’s understandable – naming scenes or functions is a creative task, and homeowners often want to live with the lighting for a bit to decide what feels natural. For example, will they use a “Party” scene often, or is it more of an “Evening” scene? Should the kitchen bright setting be called “Cooking” or just “Bright”? These seem like small details, but families sometimes debate them at length. One industry expert observed it’s “not uncommon for a homeowner to want to change the switch functionality every three months” in the early days of using a system. If integrators allow it, clients might keep tweaking scenes or labels endlessly.
This indecision can freeze the engraving process – dealers don’t want to order the permanent engraved buttons until the client is sure. As Matt Emberson of Faradite noted, having the buttons engraved can actually put a helpful stake in the ground: “once the switches are engraved, it might encourage the client to stick with the functionality and remove the need for yet another reprogramming session”. In other words, engraving is a bit of a commitment device – it forces the final call on what each button does.
Dealer Oversight or Delay
On the integrator side, there’s the responsibility to get engraving done in a timely manner. The typical process is that the integrator/programmer generates an engraving schedule or report (often using the lighting system’s software or an online tool), sends it to the homeowner for approval, then submits the order to the manufacturer. Mistakes or oversights can happen at each step. For instance, a dealer might forget to get formal sign-off and delay ordering, or mis-enter a label.
There have been cases where an installer ordered engraving with only verbal approval or outdated info, leading to errors – one Reddit discussion highlighted that it’s crucial to have the client physically sign off on an engraving report page by page, not just a verbal “okay”. If a dealer skips that step and the engraving comes back wrong, the project sees further delay and additional cost.
Other Factors & Workarounds
Timing
Engraved keycap kits often have a lead time (sometimes a couple of weeks, though many manufacturers have sped this up). If the integrator waits until the last minute to place the order, it could push the project finish back. Some luxury projects have move-in dates or unveiling events, and finding out that the keypads still have temporary labels on those dates is embarrassing for the team. It’s worth noting too that certain high-end keypads (especially new or specialized finishes) might have longer production lead times * . For example, in late 2021–2022, supply chain hiccups caused some Lutron engraved keypad orders to be delayed, particularly for the then-new 4-button styles, as one integrator noted in an online forum. So planning ahead is key.
Temporary Workarounds
Manufacturers anticipate that engraving comes last, so they provide stop-gap solutions. Lutron, for one, supplies temporary label sheets with systems like HomeWorks or RadioRA. These are basically printable or pre-printed sticker labels that integrators can apply to the blank buttons so the family isn’t left guessing which button does what while waiting for engraving. Lutron explicitly instructs installers: “Use temporary label sheets until final programming and engraving is determined” *. These stickers aren’t pretty, but they are functional and can be removed cleanly when the engraved caps arrive. It’s a best practice for dealers to put these on and not leave any button unmarked, even temporarily – confusion or a wrong guess (“I hope this is the kitchen off…oops, it was all off!”) can sour the user experience.
Other brands have similar temporary labeling options (Control4 dealers sometimes print paper inserts for the keypad buttons, etc.). The idea is to cover that interim period which could be weeks or even months.
Engraving Process Complexity
Each brand has its own procedure to get those custom labels manufactured:
Lutron
With Lutron, traditionally dealers would use an online form or the programming software to fill in the engraving text and submit to Lutron. Lutron used an engraving certificate system (each keypad purchase included a certificate for one free engraving) – the dealer would quote the certificate number when ordering the engraved kit. As of late 2024, Lutron moved away from the separate certificate system to streamline the process (no more keeping track of physical engraving credits).
Now, it’s generally handled directly through their ordering portal or design software. Lutron even allows integrators to specify engraved keypads as part of the original order so that they ship already engraved if all details are known up front, though often in custom homes details aren’t final that early. Lutron’s engraving is known for quality: text and even small icons are laser-etched and backfilled into the button, ensuring longevity and a polished look .
Crestron
Integrators using the Crestron Home platform have a built-in Engraving Order Tool. The programming interface lets the dealer design each keypad’s layout and text, then essentially “add to cart” all the engraved buttons needed. When ready, the software can generate an email to Crestron’s engraving department with all the specifications. The dealer just has to forward it to finalize the order. This integrated approach reduces manual errors (the system knows the exact keypad models and sizes needed) and keeps a project log.
Crestron’s Horizon keypads also give the option of ordering engraved or non-engraved versions; if you choose engraved, you supply the text and it comes from the factory already done, whereas non-engraved come with blank buttons that you later swap with engraved ones. Many Crestron dealers, to save time, will order a full spare set of engraved buttons for each keypad with the most up-to-date labels right before final commissioning, and just replace the temporary ones.
Control4
Control4 dealers likewise use a streamlined method. They input engraving text in the Composer programming software during setup. Control4 then provides an “Engraving Report” which shows each keypad with its button labels. Dealers upload this through the Control4 Dealer Portal’s engraving section to place the order. Turnaround is reported to be quite fast – often just a few days if standard colors – since Control4 has domestic engraving facilities.
One best practice in Control4 projects (shared on user forums) is to not rush engraving: integrators might let the homeowner use the system for a couple weeks with the LED labels on (the keypads have little LEDs that can display text temporarily, or by using placeholder names in the app) to make sure they’re comfortable with the chosen scenes, and only then order the final engraved caps.
Savant & Vantage
Both brands offer engraving services as well. Vantage’s design software can print an engraving schedule and their orders go through Legrand’s system. Savant’s Ascend keypads are specified via a lighting design tool, as mentioned, and each button can be custom-labeled; the integrator orders engraved button sets through Savant’s store or reps. These typically come in towards the end of the project similar to others.
A noted challenge especially for international or multi-language projects is ensuring the spelling, language, or iconography is correct on the engraving (some clients want foreign words or specific icons). This adds another layer of approval needed from the client to avoid mistakes.
Delays and Their Impact
When homeowners delay decisions or dealers delay ordering, the impact is mostly on the user experience timing. The system can usually function correctly with blank or temporarily labeled buttons, but it doesn’t feel “finished.” Clients may become frustrated if they move in and the buttons are unlabeled – it feels like an incomplete job. Also, from a builder/architect perspective, those small unfinished details can hold up final occupancy or owner satisfaction. It’s often the integrator who gets the blame, even if the delay was due to the homeowner not finalizing their scene names. This is why some professionals try hard to lock in engraving choices early.
Emberson (Faradite) called custom engraving “a great way for the integrator to force the homeowner to lock in their requirements during the design stage”. By pinning down the labels and uses of each button before construction is finished, everyone knows what’s expected. In fact, some high-end projects literally engrave blanks or placeholders and install keypads before final programming, as a way to visualize the plan. Tirschwell (lighting designer) mentioned that his team will “mockup engraving examples and layouts and locate them in each space to visually understand location and wayfinding” during design development.
By requiring “keypads are installed and engraved prior to commissioning,” they ensure the interface is settled and can then program the system to match it. This approach might add a revision later if something changes, but it provides a target for the project team and avoids last-minute scrambling.
Of course, the opposite school of thought is to avoid engraving until absolutely sure, even if it means living with blank buttons for a while. Koen Dekyvere of Basalte suggests that if you keep the control scheme very simple and consistent throughout the house, you might not even need engraving everywhere. “If you try to keep it simple and build an easy control concept that is streamlined in every room, you wouldn’t really need engraving. No engraving also leaves you the nice option to change the content of the scene’s buttons as the end customer can always modify them. His point is that in some cases (like hotels or secondary homes with rotating occupants) it might be better to leave buttons unmarked or use generic icons, so the functions can be repurposed without the expense of re-engraving.
However, for primary residences, most homeowners and designers still want the engraved labels – it’s part of the premium feel of the system and helps guests use the home easily. In practice, completely unengraved luxury keypads are rare except during the provisional phase.
Solutions to Streamline the Engraving Process
Several technological and process innovations have emerged to tackle the challenges around keypad engraving and to balance aesthetics vs. functionality:
1. Virtual Keypad Previews
One way to help homeowners make engraving decisions faster (and with more confidence) is to let them see what the finished keypad will look like before ordering. Many integration firms now create visual mockups of keypads during the design phase. This can be as simple as a PDF generated by the lighting software that shows a drawing of the keypad with the proposed labels, or as advanced as an interactive app.
For example, Lutron introduced an enhanced Keypad Designer feature in their Lutron Luxury Experience App that “allows you to preview text and icon-based personalizations, with a range of button layouts” before ordering * . A homeowner (or designer) can pick a keypad style, type in label ideas for each button, even choose an icon or font, and see on their tablet a realistic image of how the keypad will look engraved in their selected finish. This is tremendously useful for the design team: they can iterate on wording (does “Chandelier” fit on the button or look too cramped? maybe use “Dining” instead) and immediately visualize it. By the time the project is in final stages, the client has effectively “seen” their engraved keypads virtually and signed off on them.
Some dealers take this a step further and print high-quality paper overlays or 3D-print dummy keypads for clients. While not common, there have been cases where for a particularly design-conscious client, the integrator printed the exact text onto a sample button or used a label maker in the exact font to place on a demo keypad, giving the client a real tactile sense of the final product. These kinds of virtual or physical previews greatly reduce indecision – it makes the abstract idea of a lighting scene very concrete when you see a button labeled “Dinner” in your hand and imagine pressing it.
2. Automated Engraving Coordination
The less manual and more integrated the engraving ordering process is, the fewer chances for error or delay. We touched on how Control4 and Crestron have integrated ordering into their software. When a dealer can press a button in the programming tool and essentially send the order to the factory, it streamlines workflow. Crestron’s tool, for instance, automatically attaches the engraving file to an email for the dealer * – the dealer just forwards it to Crestron. This ensures that as soon as programming is finalized, ordering the engraved buttons is not forgotten (the UI itself might even remind the programmer, via a pending “cart” of engraving items).
Control4’s Composer software similarly produces the necessary file so that it’s just an upload away from being ordered ** . Such systems could be further improved by sending automated reminders – e.g. “Project X has un-ordered engravings, order now to avoid delay” – perhaps via the dealer portal or email alerts.
Additionally, manufacturers have been improving lead times. Some have local engraving facilities or keep blank stock ready to laser-etch on demand, meaning orders that once took 2-3 weeks might now be turned around in a few days. Faster turnaround reduces the impact of any delays and might give clients confidence that even if they order late, it’s not a long wait. For instance, Control4 was known for “usually super quick” engraving turnaround, unless there’s an unusual backlog * .
3. Clear Sign-off Protocols
This is more procedural, but many successful integrators have instituted formal sign-off sheets for keypad layouts and engraving. Before any hardware is ordered (or at least well before final), they produce a document listing each keypad location, how many buttons, and what each will say. This is circulated to the homeowner, designer, and builder early, sometimes along with the electrical plans.
By making engraving part of the design documentation, it forces those decisions into the timeline instead of leaving them to the end. It also catches any scope mismatches (“why does the great room show 2 keypads on the plan but we only have one set of labels listed?” – better to reconcile that in advance). Essentially, treating the engraving plan like one of the home’s finish schedules (akin to a paint or tile schedule) elevates its importance. The client then understands that, just as they must choose paint colors by a certain date, they need to decide on button labels by a certain milestone.
This approach combats homeowner indecision by setting expectations. One integrator humorously said that custom engraving can “force the homeowner to lock in their requirements” because once they sign that engraving sheet, they psychologically move on * .
4. Flexible or Digital Labeling Technologies
A more futuristic solution is to eliminate physical engraving lead time altogether by using keypads that can change labels digitally. While traditional engraved buttons aren’t easily changeable (you have to swap the physical button to change the label), some new products are emerging that blur this line. For example, there are touchscreen-based wall keypads that remain small (the size of a light switch) but have e-ink or OLED labels that can update. The VIOLET SmartSwitch mentioned in the HiddenWires article is a hybrid: it looks like a simple two-button keypad at first, but it’s actually a tiny touchscreen that can display more options on long-press * . It stays dark (looking like a blank switch) until needed, then can show a menu. While not a widespread replacement for dedicated engraved buttons yet, this concept could solve the engraving issue by making the button labels software-defined. If a homeowner changes their mind from “Movie” to “Cinema” for a scene name, it could be updated in software instantly on such a device. Another example is some KNX keypads in Europe that have little LCD screens next to buttons for labels, or dynamic LED matrices on buttons. As of now, these are niche and haven’t overtaken the elegance of engraved metal or plastic, but they point to a future with dynamic engraving.
For most projects today, however, the practical solutions are those previews, integrated ordering, and good process management. It’s also worth noting that manufacturers are aware of the “indecision delay” problem: Lutron’s luxury app update allowing icon previews is a direct attempt to make it fun for clients to choose their button engravings early, rather than a chore. And integrators share stories with each other about horror scenarios (like a project that dragged on months because the client wouldn’t sign off on naming) to encourage better planning.
One integrator cited in a forum a case where a client’s general contractor gave a late request for engraving changes, but the dealer had already ordered engraved keypads months prior without final homeowner approval – a miscommunication that led to wasted product. The lesson circulated was clear: don’t order until the client signs off (or conversely, don’t delay sign-off too long).
Case Study – Avoiding Engraving Delays
Consider a high-end renovation where the owners were indecisive about what each scene should be called. The integrator, learning from past jobs, scheduled an “engraving design meeting” with the clients and interior designer two months before move-in. In that meeting, they used an iPad with the Lutron Keypad app to show each keypad and allowed the clients to type in labels and try icon options. The clients, seeing immediate visual feedback, engaged like it was a creative exercise. Over a couple of hours, they named all the buttons (with some guidance to keep names concise and clear). Right after, the integrator printed out the list of engravings, had the clients sign it, and submitted the order that same week.
Result: The engraved buttons arrived and were installed ahead of the final walkthrough, and the homeowners had a fully polished system on day one. Contrast this with an earlier project by the same firm where there was no such meeting; that project saw a three-month post-occupancy delay to swap in engraved buttons because the homeowner kept changing her mind on scene names. The difference was simply using available technology (the preview app) and treating the decision timeline formally.
Case Study – Lighting Designer’s Approach
In a CEPRO interview, lighting designer Matthew Tirschwell described his process on integration projects. His team actually inputs the planned keypad engravings into the design drawings and even into the control system software upfront * . They then physically map out where each keypad goes, ensuring the locations make sense for how people will use them (this is “wayfinding” – making sure someone entering a room finds the right switch easily). By the time the integrator is programming, there’s little ambiguity about what each button does or is labeled. Tirschwell even requires that keypads are installed with their engraving before final system commissioning.
This forces any issues to surface early – if a keypad is in a bad spot or a label is wrong, they catch it in the commissioning phase when adjustments can be made. The benefit is a smoother final tune-up and happy clients who aren’t being asked to make last-minute decisions under pressure.
Tips for Homeowners and Project Teams:
Homeowners
Don’t underestimate the importance of choosing your button labels and functions. Engage with your integrator early – ask for visual examples or to see other projects’ keypads. It might feel strange to decide that one button will be called “Relax” vs “Evening,” but having that clarity will make your daily life easier. Trust the integrator’s experience if they advise certain standard scene names (many use common ones like “Cooking,” “Dining,” “All Off” that are self-explanatory). And once you decide, try living with it for a bit rather than changing it repeatedly; you can always reprogram a system, but you’ll enjoy it more if it’s consistent.
Designers/Architects
Coordinate the keypad locations and aesthetics with the integrator and client. Choose keypad finishes that complement your design scheme – there are keypads available in metal finishes, glass, matte colors, even custom materials. Early in the project, ensure there’s space for the keypads (centrally on a wall at switch height by each main entry door to the room is typical). If you’re going for a very minimal look (e.g., one keypad per room), work with the engineer to confirm that one keypad can handle all the needed circuits/scenes. If not, consider splitting loads or using a larger keypad rather than adding a second keypad late (which might mar your clean wall design).
Remember that a beautifully coordinated keypad enhances the decor – as Ravat from Retrotouch says, “the style and design of the keypad is key to the overall finish of the project”, and clients do notice it as part of the interior design.
Builders/GCs
Plan the low-voltage wiring for keypads and panel locations per the integrator’s specs. Panelized systems will need space for those panel boxes (often near electrical panels) – allocate a closet or mechanical room accordingly and ensure proper ventilation (dimmer panels can generate heat). For decentralized systems, ensure deep wall boxes if needed for smart dimmers and check that neutral wires are present (many modern smart switches require them).
Regarding engravings and final trims: treat the installation of engraved keypad buttons like a finish trim item. Build it into the schedule – for instance, “Week X: electrical trim-out, Week X+1: install engraved keypad buttons.” This way, if engraved kits are late, it’s flagged like a late appliance or light fixture would be. Encourage your clients and the integrator to have those decisions done so you’re not holding up a certificate of occupancy over something as small as a keypad label.
Integrators
Use the tools at your disposal (software, apps, demo keypads) to demystify the engraving and scene selection process for clients. It’s often new to them, and they may procrastinate simply because they don’t know what options exist. Show them examples (e.g., “Here’s a photo of another project’s keypad engraving for the kitchen, with ‘Cooking’ and ‘Entertain’ scenes”). This can inspire and expedite their choices. Also, manage expectations: if a client really can’t decide, propose a default now (like label the buttons 1–4 temporarily or use generic terms) and reassure them that you can re-engrave later if absolutely needed – but gently remind them that it’s an extra cost and effort, so it’s best to get it right the first time.
Lastly, double-check everything in writing. It’s a small detail, but a typo in an engraving (e.g. “Dinning” instead of “Dining”) can annoy a client every time they see it. Have someone on your team proofread the schedule and have the client sign-off explicitly on spelling and capitalization. This avoids any “you engraved it wrong” disputes.
Conclusion
High-end residential lighting systems bring together technology and design in a unique way. Centralized lighting systems (like those from Lutron, Crestron, Vantage) offer unparalleled convenience and a clean aesthetic, while decentralized systems (often from Control4, Savant, or hybrid Lutron setups) provide flexibility and retrofit-friendly options. Programming these systems is as much an art as a science – it requires understanding the homeowners’ lifestyle, planning with the build/design team, and keeping the user interface intuitive. The humble lighting keypad is where all that planning meets the user’s fingertip, so its evolution towards simplicity and elegance is a welcome development. Modern four-button keypads exemplify the balance of form and function: they deliver the most-used features in a beautiful package, rather than every possible feature in a cluttered array.
Achieving an ideal outcome also means sweating the details, like engraving. Engraved keypads add that finishing touch of personalization and ease of use, but the process to get them right can be fraught with delays if not proactively managed. Homeowner indecision and last-minute changes are common hurdles, but as we’ve seen, there are strategies and tools to address them – from virtual previews that make decision-making easier to procedural best practices that integrate engraving into the early design workflow. Industry experts stress clarity and simplicity at every step: decide on the control concepts early, keep the interface straightforward, and make sure everyone knows what each button will do. When these principles are followed, the result is a lighting system that just works for the people living in the home – lights that come on to the perfect scene with one button press, an interface that blends with the décor, and engraved labels that take the guesswork out of home control.
For homeowners, designers, architects, and builders embarking on a high-end lighting project, the key takeaways are: plan ahead, prioritize the user experience, and collaborate closely. By selecting the right system architecture (centralized vs decentralized) for the project, using well-designed keypads with thoughtfully chosen scene programming, and leveraging technology to finalize engraving details without delay, you can ensure the lighting control system enhances the home’s beauty and functionality in equal measure. As the saying goes in the lighting world, the best systems fade into the background – they make daily life easier and more comfortable without drawing attention to themselves.
Achieving that invisibility requires careful visible choices, and nowhere is that more evident than in the small, powerful lighting keypad on the wall.
To continue reading, click the links below or to read in full go to our Hamptons Lighting Design Blog here.
Interested in learning more for your home or business? Connect with us below!
Sources
Lutron Luxury Blog – Types of Lighting Controls & Their Benefits (definitions of localized vs centralized lighting control, use of keypads)
CustomControls – Crestron vs Lutron vs Control4 – Which is Best? (discussion of lighting scenes and keypad capabilities)
Audio Command (ACS) – Why Consider a Centralized Lighting System (advantages of centralized systems like scalability and reliability)
HiddenWires – Keypad control: keep it simple (expert insights on modern keypad design philosophy: “fewer, regularly used functions” over many buttons, aesthetic importance, engraving trends)
Control4 Tech Blog – Best Practices for Your Button Engravings (advice on naming conventions for engraved buttons to make sense to homeowners)
Lutron Technical Documentation – Personalized Engraving Instructions (recommendation to use temporary labels until final engraving is ready)
CEPro – Role of a Lighting Designer on Integration Projects (emphasizing early planning of keypad functions/engraving and installing engraved keypads before final commissioning)
rAVe Publications – Savant Intros Ascend Keypad Line (details on Savant’s keypad configurations and engraving/backlight features)
Crestron Home OS Documentation – Engravings Order Tab (example of integrated engraving ordering workflow in software)
Reddit (industry professionals) – discussions on engraving practices (importance of written client approval for engraving to avoid mistakes)
ALSO SEE: DOME SURVEILLANCE CAMERA